React 基础入门教程
React中文官网
demo样例:
1
2
3
4
5
6
7
8
9
10
11
12
13
14
15
16
17
18
19
20
21
22
23
24
| <!DOCTYPE html>
<html lang="en">
<head>
<meta charset="UTF-8">
<title>TEST</title>
</head>
<body>
<div id="test"></div>
</body>
<script src="https://unpkg.com/react@17/umd/react.production.min.js" crossorigin></script>
<script src="https://unpkg.com/react-dom@17/umd/react-dom.production.min.js" crossorigin></script>
<script src="https://unpkg.com/babel-standalone@6/babel.min.js"></script>
<script type="text/babel">
const DOM = <h1>创建虚拟DOM方式一(JSX)</h1>
ReactDOM.render(DOM,document.getElementById('test'))
</script>
</html>
|
JSX规则
1
2
3
4
5
6
7
8
9
| 1. 定义虚拟DOM时,不要写引号。
2. 标签中混入JS表达式时要用{}。
3. 样式的类名指定不要用class,要用className。
4. 内联样式,要用style={{key:value}}的形式去写。
5. 只有一个根标签
6. 标签必须闭合
7. 标签首字母
1. 若小写字母开头,则将该标签转为html中同名元素,若html中无该标签对应的同名元素,则报错
2. 若大写字母开头,react就去渲染对应的组件。若组件没有定义,则报错
|
创建虚拟DOM方式
方式一(JSX)
1
2
3
4
|
const DOM = <h1>创建虚拟DOM方式一(JSX)</h1>
ReactDOM.render(DOM,document.getElementById('test'))
|
方式二(JS)
1
2
3
4
|
const VDOM = React.createElement('h1',{id:'title'},React.createElement('span',{},'Hello,React'))
ReactDOM.render(VDOM,document.getElementById('test'))
|
组件的定义方式
方式一(函数式组件)
1
2
3
4
5
6
7
8
9
10
11
12
|
function MyComponent(){
console.log(this);
return <h2>我是用函数定义的组件(适用于【简单组件】的定义)</h2>
}
ReactDOM.render(<MyComponent/>,document.getElementById('test'))
|
方式二(类式组件)
1
2
3
4
5
6
7
8
9
10
11
12
13
14
15
16
17
|
class MyComponent extends React.Component {
render(){
console.log('render中的this:',this);
return <h2>我是用类定义的组件(适用于【复杂组件】的定义)</h2>
}
}
ReactDOM.render(<MyComponent/>,document.getElementById('test'))
|
组件实例的三大属性
State(状态)
React 把组件看成是一个状态机(State Machines)。通过与用户的交互,实现不同状态,然后渲染 UI,让用户界面和数据保持一致。
React 里,只需更新组件的 state,然后根据新的 state 重新渲染用户界面(不要操作 DOM)。
1
2
3
4
5
6
7
8
9
10
11
12
13
14
15
16
17
18
19
20
21
22
23
24
25
26
| class TestComponent extends React.Component {
state = {
flag: false
}
changeFlag(flag){
console.log("changeFlag")
this.setState({flag: flag})
}
render() {
console.log("render")
const {flag} = this.state
return (
<div>
<h1>今天天气好{flag ? "炎热" : "凉爽"}</h1>
<button onClick={() => this.changeFlag(!this.state.flag)}>点击我</button>
</div>
)
}
}
ReactDOM.render(<TestComponent/>, document.getElementById("test"))
|
Props(传参)
state 和 props 主要的区别在于 props 是不可变的,而 state 可以根据与用户交互来改变。
这就是为什么有些容器组件需要定义 state 来更新和修改数据。 而子组件只能通过 props 来传递数据。
1
2
3
4
5
6
7
8
9
10
11
12
13
14
15
16
17
18
19
20
21
22
23
24
25
26
27
28
29
30
31
| class TestComponent extends React.Component {
render() {
console.log("render")
const {className, grade, list} = this.props
return (
<div>
<h2>{schoolName}-年级:{grade}-{classNum}班</h2>
<div>
{
list.map((item, index) => {
return (
<ul key={item.id} onClick={() => this.alertInfo(item)}>
<li>姓名:{item.name}</li>
<li>年龄:{item.age}</li>
</ul>
)
})
}
</div>
</div>
)
}
}
const cla = {
schoolName: "XX高级中学",
classNum: 1,
grade: "高中",
list: [{id: 1, name: "张三", age: "18"}, {id: 2, name: "李四", age: 18}, {id: 3, name: "王五", age: 20}]
}
ReactDOM.render(<TestComponent {...cla}/>, document.getElementById("test"))
|
参数限制
自 React v15.5 起,React.PropTypes 已移入另一个包中。请使用 prop-types 库 代替。
1
2
3
4
5
6
7
8
9
10
11
12
13
14
15
16
17
18
19
20
21
22
23
24
25
| class TestComponent extends React.Component{}...
TestComponent.propTypes = {
schoolName: PropTypes.string.isRequired,
classNum: PropTypes.number,
afterSchool: PropTypes.func.isRequired,
}
TestComponent.defaultProps = {
grade:'高中',
classNum:1,
}
const cla = {
schoolName:"江宁高级中学",
classNum: 1,
list: [{id: 1, name: "张三", age: "18"}, {id: 2, name: "李四", age: 18}, {id: 3, name: "王五", age: 20}]
}
ReactDOM.render(<TestComponent {...cla} afterSchool={afterSchool}/>, document.getElementById("test"))
function afterSchool() {
console.info("放学啦。。。");
}
|
函数式组件使用
1
2
3
4
5
6
7
8
9
10
11
12
13
14
15
16
17
18
19
20
21
22
23
24
|
function Person (props){
const {name,age,sex} = props
return (
<ul>
<li>姓名:{name}</li>
<li>性别:{sex}</li>
<li>年龄:{age}</li>
</ul>
)
}
Person.propTypes = {
name:PropTypes.string.isRequired,
sex:PropTypes.string,
age:PropTypes.number,
}
Person.defaultProps = {
sex:'男',
age:18
}
ReactDOM.render(<Person name="jerry"/>,document.getElementById('test'))
|
Ref(可以获取真实DOM节点)
React提供的这个ref属性,**表示为对组件真正实例的引用,其实就是ReactDOM.render()返回的组件实例**;需要区分一下,ReactDOM.render()渲染组件时返回的是组件实例;而渲染dom元素时,返回是具体的dom节点。
通过event.target得到发生事件的DOM元素对象 ,不要过度使用ref
官方说明:你可能首先会想到使用 refs 在你的 app 中“让事情发生”。如果是这种情况,请花一点时间,认真再考虑一下 state 属性应该被安排在哪个组件层中。通常你会想明白,让更高的组件层级拥有这个 state,是更恰当的。查看 状态提升 以获取更多有关示例
字符串形式
1
2
3
4
5
6
7
8
9
10
11
12
13
14
15
16
17
18
19
20
21
22
23
| class TestComponent extends React.Component {
test1 = (e) => {
let {test1} = this.refs;
console.info(test1, test1.value)
}
test2 = (e) => {
console.info(e, e.target.value)
}
render() {
return (
<div>
<input ref="test1" placeholder="test1"/>
<br/>
<button onClick={this.test1}>点击获取test1数据</button>
<br/>
<input placeholder="失去焦点获取当前输入数据" onBlur={this.test2}/>
</div>
)
}
}
ReactDOM.render(<TestComponent/>, document.getElementById("test"))
|
回调函数形式
1
2
3
4
5
6
7
8
9
10
11
12
13
14
15
16
17
18
19
20
21
22
23
24
25
26
27
28
29
30
31
32
33
34
|
class TestComponent extends React.Component {
test1 = (e) => {
let {input1} = this;
console.info(input1, input1.value)
}
test2 = (e) => {
console.info(e, e.target.value)
}
saveInput = (a)=>{
this.input1 = a;
console.log('@',a);
}
render() {
return (
<div>
{/*JSX里的注释得这么写*/}
{/* 方式一 */}
{/* a标识当前元素,{}方法体里表示:将当前元素a赋值给当前实例中的属性input1 */}
{/* <input ref={a => {this.input1 = a;console.log('@',a)}} placeholder="test1"/>*/}
{/* 方式二 */}
<input ref={this.saveInput} placeholder="test1"/>
<br/>
<button onClick={this.test1}>点击获取test1数据</button>
<br/>
<input placeholder="失去焦点获取当前输入数据" onBlur={this.test2}/>
</div>
)
}
}
ReactDOM.render(<TestComponent/>, document.getElementById("test"))
|
React.createRef()形式
1
2
3
4
5
6
7
8
9
10
11
12
13
14
15
16
17
18
19
20
21
22
23
24
25
|
class TestComponent extends React.Component {
input1 = React.createRef();
input2 = React.createRef();
test1 = (e) => {
console.info(this.input1, this.input1.current.value)
}
test2 = (e) => {
console.info(e, this.input2.current.value)
}
render() {
return (
<div>
<input ref={this.input1} placeholder="test1"/>
<br/>
<button onClick={this.test1}>点击获取test1数据</button>
<br/>
<input ref={this.input2} placeholder="失去焦点获取当前输入数据" onBlur={this.test2}/>
</div>
)
}
}
ReactDOM.render(<TestComponent/>, document.getElementById("test"))
|
React的受控组件和非受控组件
受控组件就是可以被 react 状态控制的组件
在 react 中,Input textarea 等组件默认是非受控组件(输入框内部的值是用户控制,和React无关)。但是也可以转化成受控组件,就是通过 onChange 事件获取当前输入内容,将当前输入内容作为 value 传入,此时就成为受控组件。
好处:可以通过 onChange 事件控制用户输入,使用正则表达式过滤不合理输入。
React没有实现数据的双向绑定,一句话概括:双向数据绑定就是受控组件
高阶函数定义
如果一个函数符合下面2个规范中的任何一个,那该函数就是高阶函数。
- 若某xx函数,接收的参数是一个函数,那么xx函数就可以称之为高阶函数。
- 若某xx函数,调用的返回值依然是一个函数,那么xx函数就可以称之为高阶函数。
常见的高阶函数有:Promise、setTimeout、arr.map()等等。。。
React生命周期
(旧)生命周期
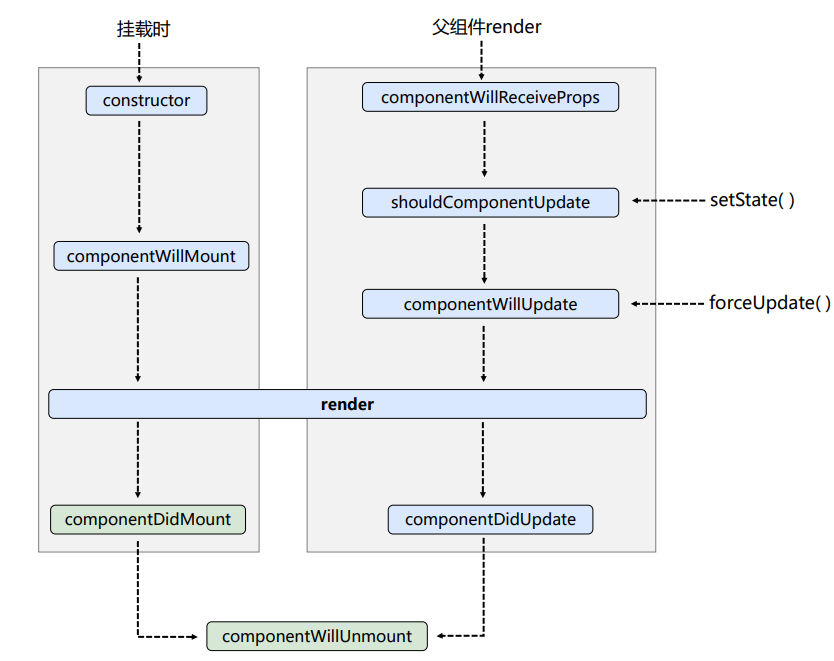
(旧)生命周期详解:
18版本可能会移除的钩子函数:
componentWillMount()【组件将要挂载的钩子】已弃用
componentWillUpdate()【组件将要更新的钩子】已弃用
componentWillReceiveProps(props)【子组件将要接收新的props的钩子】已弃用
17版本还可以用,但是必须得加上UNSAFE_前缀
举例:UNSAFE_componentWillMount()
初始化阶段: 由ReactDOM.render()触发—初次渲染
constructor(props)【构造器】componentWillMount()【组件将要挂载的钩子】已弃用render()【将虚拟DOM渲染到页面】(必须用)componentDidMount() 【组件挂载完毕的钩子】(常用:一般在这个钩子中做一些初始化的事,例如:开启定时器、发送网络请求、订阅消息)
更新阶段: 由组件内部this.setSate()或父组件render()触发
shouldComponentUpdate()【控制组件更新的“阀门”,有返回值:true/false】componentWillUpdate()【组件将要更新的钩子】已弃用render()【将虚拟DOM渲染到页面】(必须用)componentDidUpdate()【组件更新完毕的钩子】
componentWillReceiveProps(props)【子组件将要接收新的props的钩子】已弃用
卸载组件: 由ReactDOM.unmountComponentAtNode({真实DOM元素})触发
示例:ReactDOM.unmountComponentAtNode(document.getElementById(‘test’))
componentWillUnmount() 【组件将要卸载的钩子】 (常用:一般在这个钩子中做一些收尾的事,例如:关闭定时器、取消订阅消息)
代码示例:
1
2
3
4
5
6
7
8
9
10
11
12
13
14
15
16
17
18
19
20
21
22
23
24
25
26
27
28
29
30
31
32
33
34
35
36
37
38
39
40
41
42
43
44
45
46
47
48
49
50
51
52
53
54
55
56
57
58
59
60
61
62
63
64
65
66
67
68
69
70
71
72
73
74
75
76
77
78
79
80
81
82
83
84
85
86
87
88
89
90
91
92
93
94
95
96
97
98
99
100
101
102
103
104
105
106
107
108
109
110
111
112
113
114
115
116
117
118
119
| class TestComponent extends React.Component {
constructor(props) {
console.log('constructor-构造器', props);
super(props)
this.state = {count: 0}
}
componentWillMount() {
console.info("componentWillMount-组件将要挂载的钩子")
}
componentDidMount() {
console.info("componentDidMount-组件挂载完毕的钩子-(常用:一般在这个钩子中做一些初始化的事,例如:开启定时器、发送网络请求、订阅消息)")
}
shouldComponentUpdate() {
console.info("shouldComponentUpdate-控制组件更新的“阀门”,有返回值:true/false")
return this.state.count % 2 === 0;
}
componentWillUpdate() {
console.info("componentWillUpdate-组件将要更新的钩子")
}
componentDidUpdate() {
console.log('componentDidUpdate-组件更新完毕的钩子');
}
render() {
console.info("render-将虚拟DOM渲染到页面")
let {count} = this.state;
return (
<div>
<h1>我是父组件,当前数字:{count}</h1>
<button onClick={() => this.addCount()}>点我+1</button>
<button onClick={() => this.forceUpdate()}>强制更新</button>
<button onClick={() => ReactDOM.unmountComponentAtNode(document.getElementById('test'))}
style={{backgroundColor: "red"}}>卸载组件
</button>
<A count={this.state.count}></A>
</div>
)
}
componentWillUnmount() {
console.info("componentWillUnmount-组件将要卸载的钩子-(常用:一般在这个钩子中做一些收尾的事,例如:关闭定时器、取消订阅消息)")
}
addCount() {
this.setState({count: this.state.count + 1});
}
}
class A extends React.Component {
componentWillReceiveProps(props) {
console.log('A---componentWillReceiveProps', props);
}
shouldComponentUpdate() {
console.log('A---shouldComponentUpdate');
return true
}
componentWillUpdate() {
console.log('A---componentWillUpdate');
}
componentDidUpdate() {
console.log('A---componentDidUpdate');
}
render() {
return (
<div>
<h2>我是子组件“A”,父组件传过来的值是:{this.props.count}</h2>
</div>
)
}
}
ReactDOM.render(<TestComponent a="aaa" b="bbb"/>, document.getElementById("test"));
|
(新)生命周期
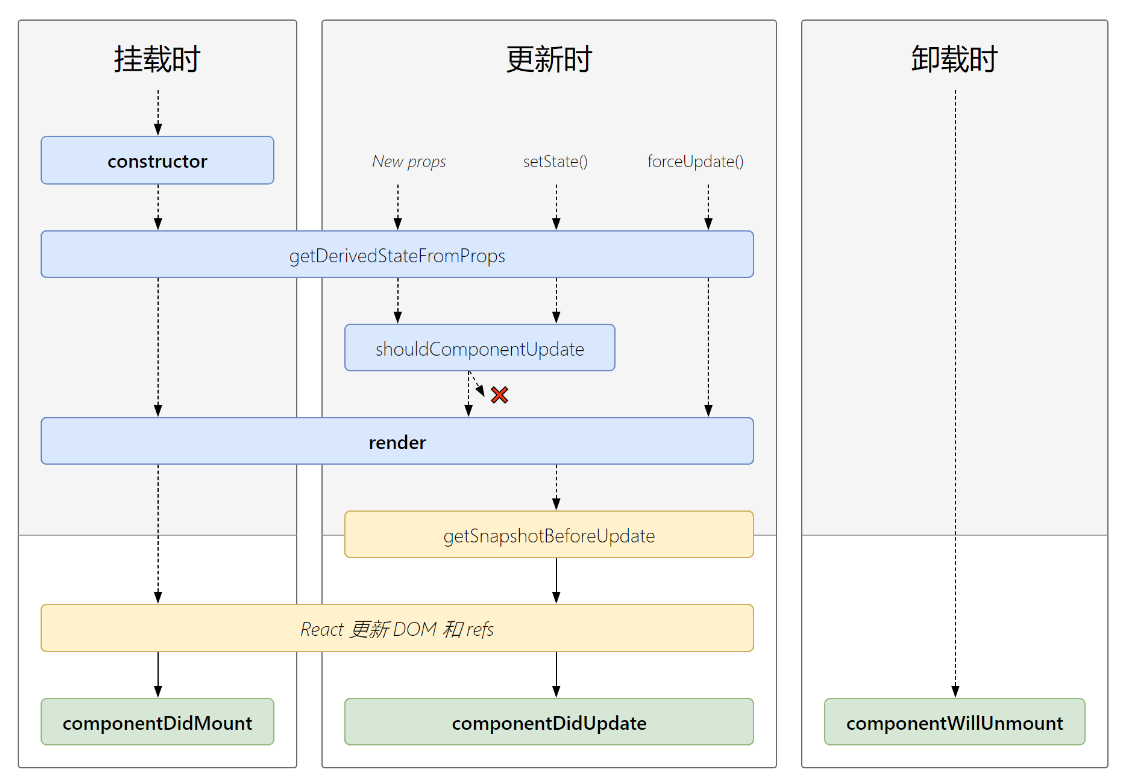
*展示不常用生命周期:
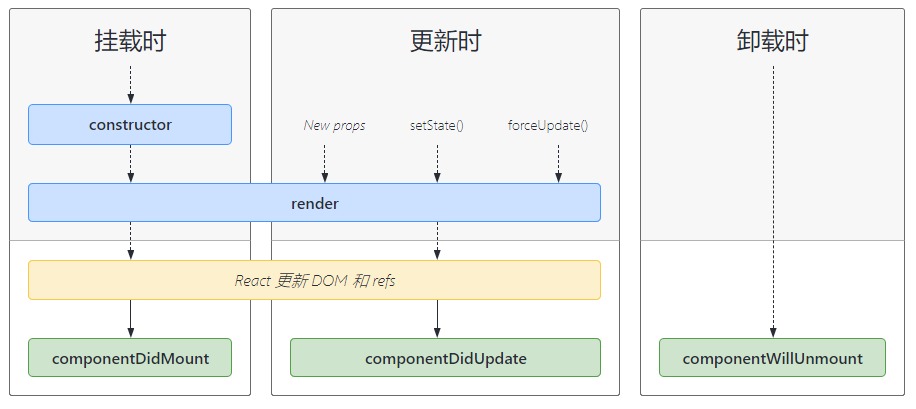
展示常用生命周期:
(新)生命周期详解:
官方文档:生命周期
初始化阶段: 由ReactDOM.render()触发—初次渲染
constructor(props)【构造器】
getDerivedStateFromProps(props,state)
代码示例:
1
2
3
4
5
| static getDerivedStateFromProps(props,state){
console.log('getDerivedStateFromProps',props,state);
return null
}
|
新增(极少用到)
若state的值在任何时候都取决于props,那么可以使用getDerivedStateFromProps
render()【将虚拟DOM渲染到页面】(必须用)
componentDidMount() 【组件挂载完毕的钩子】(常用:一般在这个钩子中做一些初始化的事,例如:开启定时器、发送网络请求、订阅消息)
更新阶段: 由组件内部this.setSate()或父组件重新render()触发
getDerivedStateFromProps(props,state)
代码示例:
1
2
3
4
5
| static getDerivedStateFromProps(props,state){
console.log('getDerivedStateFromProps',props,state);
return null
}
|
新增(极少用到)
若state的值在任何时候都取决于props,那么可以使用getDerivedStateFromProps
shouldComponentUpdate()【控制组件更新的“阀门”,有返回值:true/false】
render()【将虚拟DOM渲染到页面】(必须用)
getSnapshotBeforeUpdate(prevProps, prevState)【在更新之前获取快照】
新增(极少用到)
使用场景:类似微信朋友圈,朋友圈消息在不断更新动态新增时,刷到中间时停住,同时,消息也在不断新增。
componentDidUpdate(prevProps, prevState, snapshot)【组件更新完毕的钩子】
卸载组件: 由ReactDOM.unmountComponentAtNode({真实DOM元素})触发
示例:ReactDOM.unmountComponentAtNode(document.getElementById(‘test’))
componentWillUnmount() 【组件将要卸载的钩子】 (常用:一般在这个钩子中做一些收尾的事,例如:关闭定时器、取消订阅消息)
代码示例:
1
2
3
4
5
6
7
8
9
10
11
12
13
14
15
16
17
18
19
20
21
22
23
24
25
26
27
28
29
30
31
32
33
34
35
36
37
38
39
40
41
42
43
44
45
46
47
48
49
50
51
52
53
54
55
56
57
58
59
60
61
62
63
64
65
66
67
68
69
70
71
72
73
74
75
76
77
78
79
80
81
82
83
84
85
86
87
88
89
90
91
92
| class TestComponent extends React.Component {
constructor(props) {
console.log('constructor-构造器', props);
super(props)
this.state = {count: 0}
}
static getDerivedStateFromProps(props, state) {
console.log('getDerivedStateFromProps-若state的值在任何时候都取决于props', props, state);
return null;
}
shouldComponentUpdate(props, state, value) {
console.info("shouldComponentUpdate-控制组件更新的“阀门”,有返回值:true/false", props, state, value)
return this.state.count % 2 === 0;
}
componentDidMount() {
console.info("componentDidMount-组件挂载完毕的钩子-(常用:一般在这个钩子中做一些初始化的事,例如:开启定时器、发送网络请求、订阅消息)")
}
componentDidUpdate(prevProps, prevState, snapshot) {
console.log('componentDidUpdate-组件更新完毕的钩子', prevProps, prevState, snapshot);
}
render() {
console.info("render-将虚拟DOM渲染到页面")
let {count} = this.state;
return (
<div>
<h1>我是父组件,当前数字:{count}</h1>
<button onClick={() => this.addCount()}>点我+1</button>
<button onClick={() => this.forceUpdate()}>强制更新</button>
<button onClick={() => ReactDOM.unmountComponentAtNode(document.getElementById('test'))}
style={{backgroundColor: "red"}}>卸载组件
</button>
</div>
)
}
getSnapshotBeforeUpdate() {
console.log('getSnapshotBeforeUpdate-在更新之前获取快照');
}
componentWillUnmount() {
console.info("componentWillUnmount-组件将要卸载的钩子-(常用:一般在这个钩子中做一些收尾的事,例如:关闭定时器、取消订阅消息)")
}
addCount() {
this.setState({count: this.state.count + 1});
}
}
ReactDOM.render(<TestComponent a="aaa" b="bbb"/>, document.getElementById("test"));
|
Diffing算法
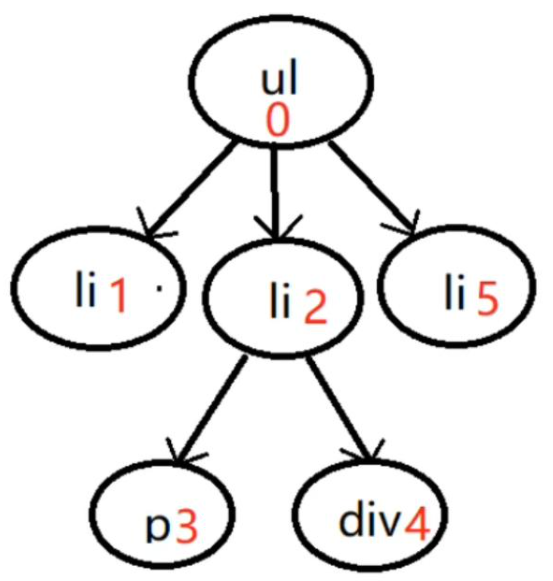
diff算法其实就是对DOM进行different比较不同的一种算法(虚拟的比较更节约性能) 补丁:用来更新DOM的任务
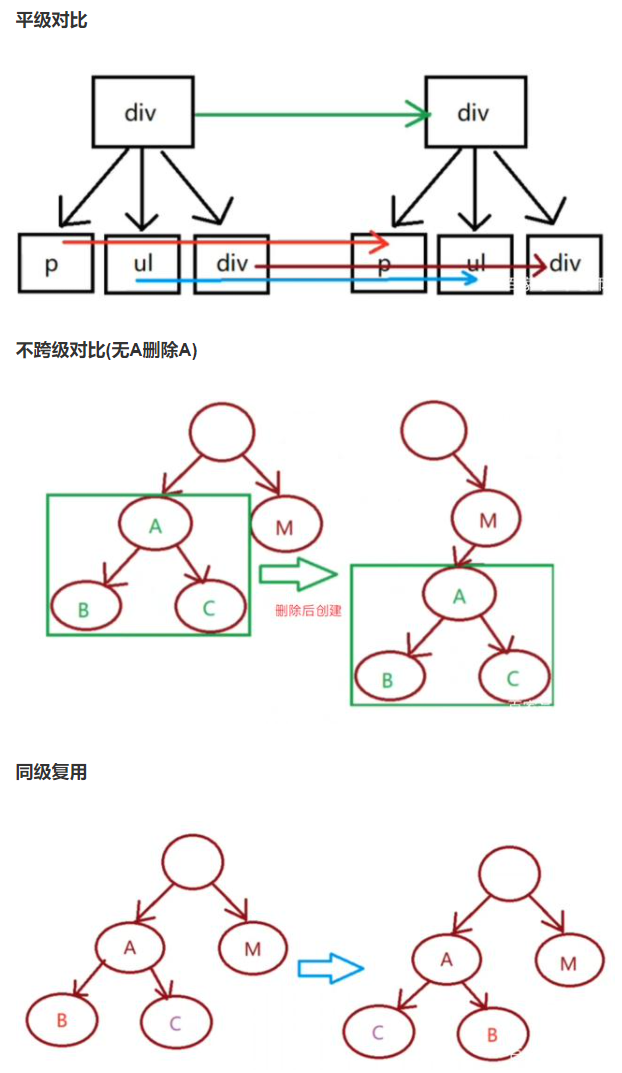
遍历规则:先序深度优先遍历(从根节点向下级子节点遍历)
0是根节点、1 2 5叫广度优先、1 2 3 4 5深度优先
For循环为什么key不能用index索引值作为key
可能会出现严重的效率问题
1
2
3
4
5
6
7
8
9
10
11
12
13
14
15
16
17
18
19
20
21
22
23
24
25
26
27
28
29
30
31
32
33
34
35
36
37
38
39
40
41
42
43
44
45
46
47
48
49
50
51
52
53
54
55
56
57
58
59
60
61
62
63
64
65
66
67
68
69
70
71
72
73
74
75
76
77
78
79
80
81
82
83
84
85
86
87
88
89
90
91
92
93
94
95
96
97
98
99
100
101
102
103
104
105
106
107
108
109
110
111
112
113
114
115
116
117
118
119
|
class Person extends React.Component{
state = {
persons:[
{id:1,name:'小张',age:18},
{id:2,name:'小李',age:19},
]
}
add = ()=>{
const {persons} = this.state
const p = {id:persons.length+1,name:'小王',age:20}
this.setState({persons:[p,...persons]})
}
render(){
return (
<div>
<h2>展示人员信息</h2>
<button onClick={this.add}>添加一个小王</button>
<h3>使用index(索引值)作为key</h3>
<ul>
{
this.state.persons.map((personObj,index)=>{
return <li key={index}>{personObj.name}---{personObj.age}<input type="text"/></li>
})
}
</ul>
<hr/>
<hr/>
<h3>使用id(数据的唯一标识)作为key</h3>
<ul>
{
this.state.persons.map((personObj)=>{
return <li key={personObj.id}>{personObj.name}---{personObj.age}<input type="text"/></li>
})
}
</ul>
</div>
)
}
}
ReactDOM.render(<Person/>,document.getElementById('test'))
|


